Implement Access Control in Node.js

Most web applications rely on some sort of access control to keep users from accessing information not meant for them. If authentication is a lock on the main door of the hotel, then access control is the individual access card they give to each user for accessing their room.
We have spent quite a few blog posts on various theories about security mechanisms for web applications (Set Up a Secure Node.js Web Application, Unvalidated Redirects, What Do You Know About Clickjacking? etc). In this post we will go beyond theory and take a more hands on approach by building RBAC module from the scratch so we can review our user’s privileges. Our aim, as usual, is to make the web a securer place for everyone.
We will begin with a short recap on access control theory followed by incremental how-to steps for building it.
So let’s get started.
Relearn Access Control
When asking developers to name different access control methods, the usual answer seems to be ACL and RBAC. If you answered this question the same way, then you are also among the misinformed. Let’s look at both of these in turn and then explain why.
ACL or Access Control List is an implementation of access control, usually represented as a table of privileges.

In this table we can see how each user is a row and has specific privileges assigned to them. Upon access control check, the user’s row and the column in question are cross-checked — this determines if this user has access or not.
RBAC or Role Based Access Control is an access control method where users are given roles and the roles determine what privileges they have. It is usually described as a tree or diagram, as roles can inherit accesses from their parent roles. So our previous ACL table could look something like this:

These are the common understandings of ACL and RBAC and they are both incorrect. And here’s why:
First of all, ACL is not an access control model, but an implementation type. It is often confused with IBAC (Identity Based Access Control) where each individual has their access rights determined separately — based on identity.
That sounds very much like the ACL we described earlier. However, ACL variations like ACLg can also be used to implement RBAC access model. We simply substitute the individual for a group. As a result we end up with:

This means ACLg (g stands for grouped) is equivalent of RBACm (m stands for minimal). You might be wondering where is the hierarchy in this model. Well there isn’t any. RBAC doesn’t have hierarchy written in the basic definition — it is an added extra in a model referred to HRBAC (Hierarchical Role Based Access Control).
So to recap: ACL is not an access control model, but an implementation type and RBAC does not have hierarchy by the baseline definition.
Know Your Access Control
Now that we have determined that we have some misconceptions about the most popular access control methods, let’s take a look at what types of access control there actually are. By the end of this section you should have an overview of the common access control methods and how they differ.
MAC/DAC (Mandatory/Discretionary Access Control) — although completely separate access control methods, I grouped them together as these two only differ in one important aspect. Both focus on the data object as the center of access rights. Discretionary access control method can most readily be seen in UNIX systems, where the owner of any given file has control over whom to give access. The access rights are in his/her discretion — hence the name. MAC also focuses on the data object as the basis of access rights, however the rights are not determined by the owner, but instead by the sensitivity of the data object. This method is most often seen in governmental or military systems due to the high costs of implementation.

In short MAC and DAC both focus on the data object or file, whereas DAC allows me (the owner of the file) to determine who has access. In MAC however the access rights are determined by the administrator or general rule.

IBAC (Identity Based Access Control) — this method focuses on the identity of the user as the basis of the privileges. Each individual is given specific access rights for every operation. The benefits are high granularity in assigning rights and simplicity in systems with a few users. However as systems grow in user numbers, then it usually gets difficult to manage.

RBAC (Role Based Access Control) — tries to solve the limitations of IBAC management in large systems by mimicking the real world needs more closely. Operational privileges are grouped into roles and each user is assigned a role. The role, instead of the individual, is the basis for access checks. It is often implemented in a hierarchical model, where higher level roles inherit the privileges from lower levels. RBAC sacrifices granularity for higher maintainability in systems with lots of users.


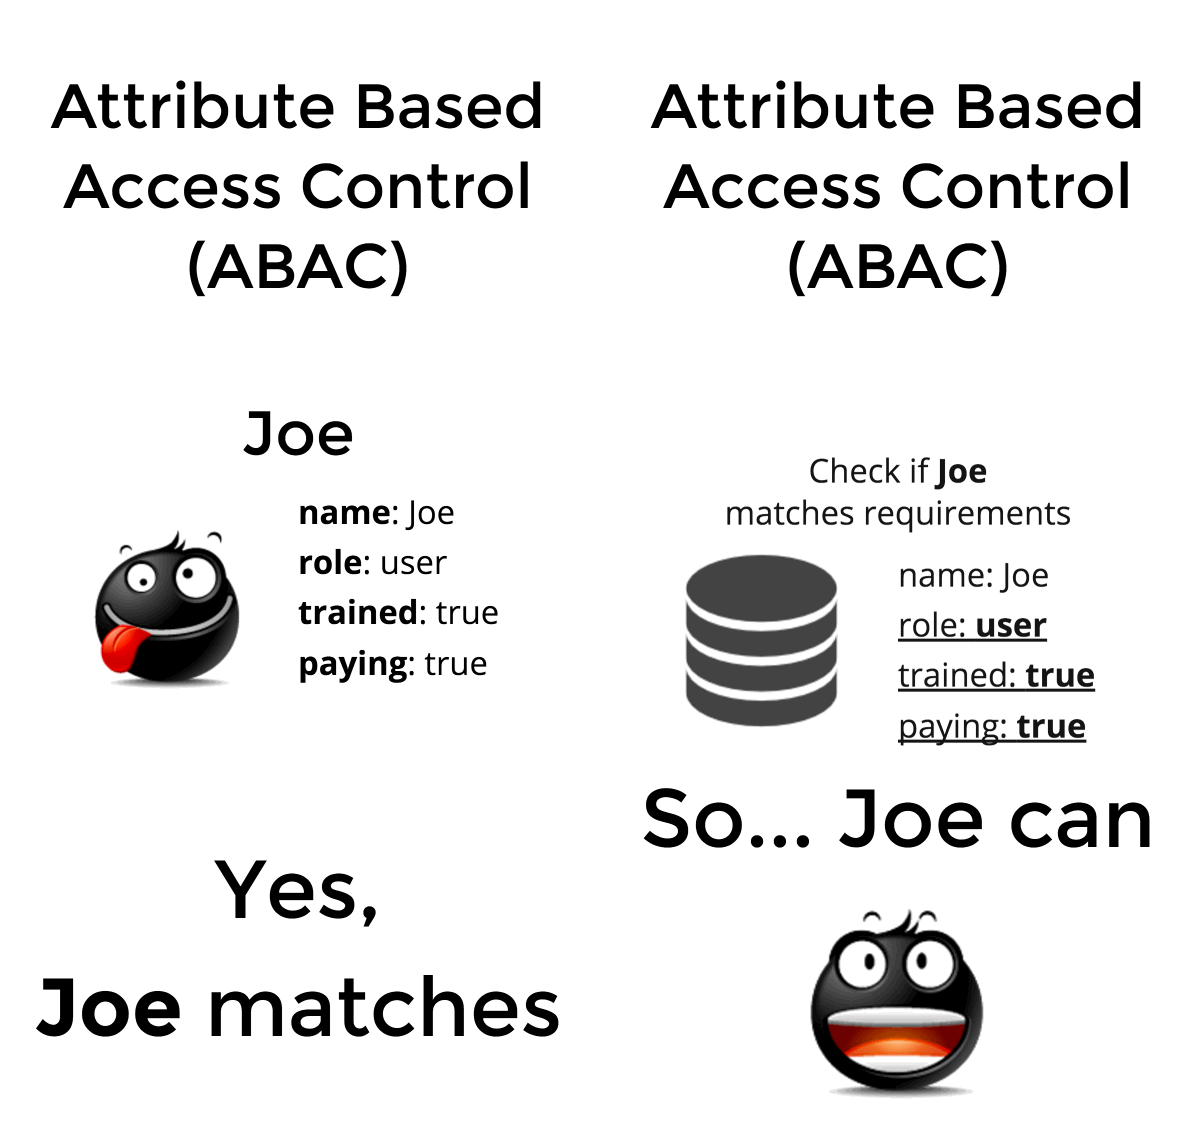
ABAC (Attribute Based Access Control) — is an evolution of RBAC that tries to solve some shortcomings in specific situations. In systems where there are many attributes that separate access to internal resources (i.e. has the user passed some tests and been educated in the use of this part of the system etc), using the RBAC model would result in what is known as the role explosion — a need to define all the roles that separate users based on their attributes. ABAC aims to solve this problem by providing a framework for defining access rights based on the various properties of a user.

Hope you found these detailed nuances useful? In the next section we will take a closer look at the most popular access control method of the web — RBAC.
Details of RBAC
RBAC or Role Based Access Control is an access control method where each identity is assigned a role and the roles determine what access rights the identity has. This is opposed to IBAC, where each identity has separate privilege assignment. RBAC looses some granularity compared to IBAC, however it gains better manageability in environments with large amounts of users.
RBAC is usually implemented as a Hierarchy of roles (HRBAC). This allows roles to inherit privileges from other roles, which in turn makes it easier to add new operational privileges to the whole tree.
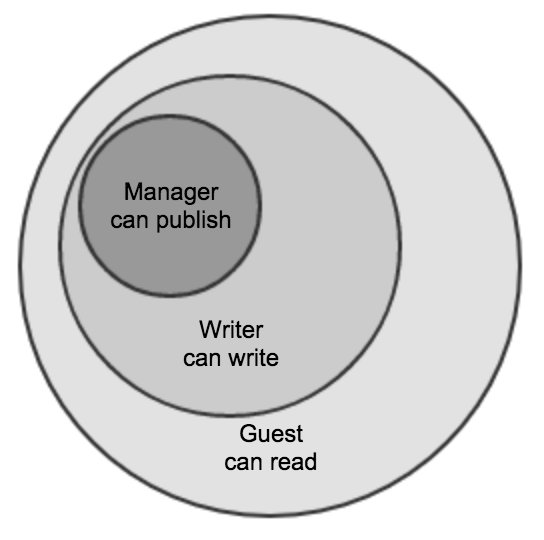
Let’s envision an app where we have three roles: ‘Guest’, ‘Writer’, ‘Manager’. We can then illustrate the role hierarchy as follows:

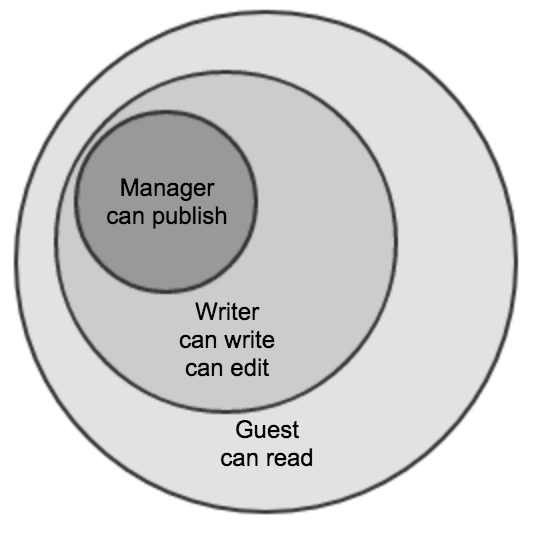
If we now want to add an edit operation, which is allowed for both writer and manager, then all we have to do is extend the writer role:

The definition of roles is also a welcome feature during application development. By separating users into well defined categories beforehand we are more easily able to model the application security.
In short RBAC is the de-facto standard access control method for most web applications. Mainly because building a web app means that you expect to handle a vast amount of users — thousands, millions even billions (one can dream). Implementing IBAC in this situation would result in enormous data duplication for access rights.
Now that we are more familiar with the logic behind RBAC, we can proceed with our plan to build a RBAC module.
Ready, Set, Build
Having theoretical knowledge about access control is nice, but unless put to use, we could have spent our time watching pictures of cute kittens instead. So let’s not stop there and let’s start building
The logic of a basic RBAC model is simple — you define a number of roles and each role has privileges assigned to it. When checking for access you check if the role has access and that’s it.
So our example from before can be summed in two tables:

We can achieve this model fairly easily in JavaScript — let’s create a model of the roles and a function to check them.
And now we have a very simple role system. Let’s give it a configurable and reusable form in the manner of a class.
This leaves us with a very simple module for defining and checking roles. Let’s not stop here — we will add hierarchy to the model so that we can manage roles more easily when adding new operations to the system.
This way there is no need to define rights to every operation for each role separately.
It’ll allow the user to represent a list of child roles, where to inherit permissions from.
And then we have to rewrite the access check functionality. In HRBAC model, the access checking begins with the current role, checks if it has access, if not then moves up to the parent and checks again. This happens until a permission is found or there are no more parents to check. So we can rewrite our checking functionality to use recursive logic:
Now we have roles, inheritance and a function to bring it together. Almost done, but not quite there yet. There are still real use cases that we haven’t accounted for. Let me give you an example based on a blogging platform where a writer can create a blog post and then open it up for editing — should the writer role also allow to rewrite every post in the system? Probably not. We need to first check if they are the owner of the post. But how can we write that into a reusable definition — functions? To answer this, let’s allow operations to define functions that need to pass.
So to extend our existing model of roles:
But now our check function also needs to be rewritten — we can no longer use indexOf either. Let’s create a function to normalise our input for better internal use:
And now we can use the map we created in our check function:
Awesome! We now have RBAC class that we can use to check our defined hierarchy model. Additionally, we can also define functions to do dynamic checks for specific access:
RBAC.can('writer', 'edit', {user: user, post: post});We are still not done. Let’s not forget that we are dealing with Node.js so synchronous solutions are not the best way to go — we need async so that we can instantiate the class with information found in the database. Or we might want our access check to look something up from the file system, other API or somewhere else. Point is — we need it.
We can provide this in two ways — with promises or callbacks. Because we want to be supportive of both styles let’s implement both. However transformation from Promise to callback is much easier than vice versa so we’ll use Promises internally.
We’ll start our update with the check function. Let’s use the Q module to provide backwards compatibility. We can just wrap the contents of our function in a promise constructor:
We can then handle callbacks by optionally binding the handlers for our promise.
We can internally handle the resolve/reject events, by specifying a callback ourselves
And we can handle the inheritance by creating a new promise. One that resolves when any one of the child promises resolves — aka use Q.any.
After adding some type checks, our can function could look something like this:
Now we are almost done. The last thing we want to support is asynchronous loading of the definitions of roles. This means we have to handle the initialisation. The easiest way to accept a function as an input that can return the configuration object after obtaining it somewhere. To do this, let’s add a check in the beginning of init function and store the resolve state in a variable:
// If opts is a function execute for async loading if(typeof roles === 'function') {
  this._init = Q.nfcall(roles)
                .then(data => this.init(data));
  return;
}
And add $this._inited = true before the return statement.
Now we can check at the beginning of the can function if we have managed to set up our roles and act accordingly:
// If not inited then wait until init finishes if(!this._inited) {
  return this._init
             .then(() => this.can(role, operation, params, cb));
}
And now we are done on the functionality part.
Start Controlling Access
In the previous section we built a nice and simple access control module that I have published under the name easy-rbac. In this section we will look at how to add proper role based access control to an express application using a combination of easy-session (a session handling module I have written some time ago) and easy-rbac (the module we built, which is now integrated to easy-session).
First we will set up an express application with easy-session and a few routes for us to test our sessions:
Now we have our base setup, but what if our application is expanding — we are adding functionality to read and write blog posts; everyone can read and writers can write? We could do it by checking the role like this:
This is, however, one of the most common mistakes made in implementing RBAC — looking for specific roles instead of validating operations. It is not scalable. What happens when we create new roles that are also supposed to be able to create blog posts? We would have to come back and rewrite this logic all the time. Not good.
Instead, we should be focusing on operations — roles can be added, hierarchies change, but if we always check for ‘post:create’ (the notation ‘blog:create’ has no technical implementation value, the semantics just help organise and keep a consistent naming), then we won’t have to change our code. But in order to do that, we will need to configure our integrated easy-rbac.
Or if we want to store our role logic in the database layer, so that it is centralised across application instances, we can set up an async function to retrieve it:
And now we can check for the right to create blog posts.
Even better, let’s move the validation into a middleware to keep our logic clean.
Awesome — heading in the right direction. Let’s now set up an edit path as well. However, here we can’t just check if the user is a writer any more. I wouldn’t want some other writer to change my posts. So we are going to have to set up conditions by changing the writer’s role definition:
We’ll also need the user on the session object:
And finally we need a way to look up a blog object and test if we can actually edit:
Again we can do this with middleware
And there we have it. A nice access control setup that we can easily reuse throughout our application.
Wrapping Up
In this post we looked at various access control methods and debunked some common misconceptions along the way. You should now know the key methodologies and how they differ.
In the second half we got our hands dirty. We started by coding an access control module and then implemented access control for a simple test application using easy-session. All in a days work.
In the future, you should know to avoid checking roles directly and focus on operations instead. Also, I sincerely hope that you won’t forget to add access checks where needed.
If you found this post useful and want a more thorough overview of authentication, access control methods and other Node.js security topics, I recommend you read my book Secure Your Node.js Web Application: Keep Attackers Out and Users Happy


